Saturday, January 10, 2015

T-shirt to Jersey

It's game time! Maybe it's a theme bout, maybe your team doesn't have fancy jerseys, maybe you just want to hack your scrimmage Ts, whatever, this post will show you how to transform a plain old T-shirt into a V-neck roller derby jersey. In my case, our jerseys didn't arrive in time for our first bout (they were bouts back then) so we had a bunch of shirts printed with our team name on them, but whoever ordered just guessed at everyone's sizes because of the short notice. In my case, well, short doesn't equal skinny so I needed to add a little to the middle of my size small shirt. This will also work if your shirt is too big! Sewing by machine is required, and I'm assuming you know how to sew.


Materials:

Tshirt- prewash & shrink it!!
Scraps of stretch material- I used metallic spandex left from sewing shorts- if you're buying it, 1/4 yard would probably do 2 shirts.
Matching thread

Tools:
Sewing machine and all the stuff you need to sew with
It helps to use microtex or "sharp" needles- if your machine is skipping stitches, make sure you're using one of those, and if it still skips, put tissue paper under the fabric as you sew.

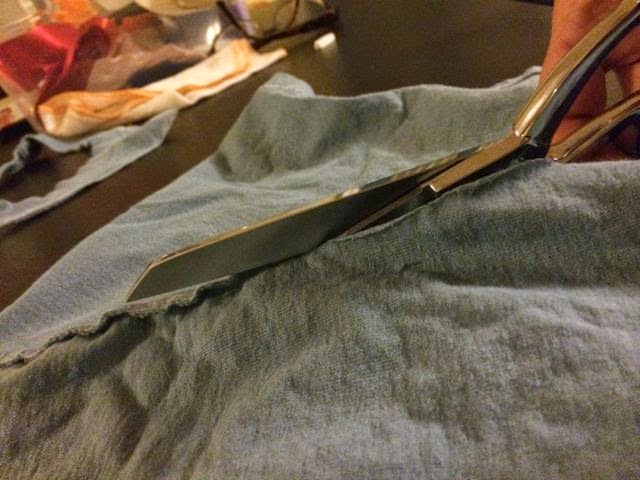
Step 1: Turn your T-shirt inside out and cut off the sleeves, right along the seam. Also cut off the ribbed collar right along the seam.


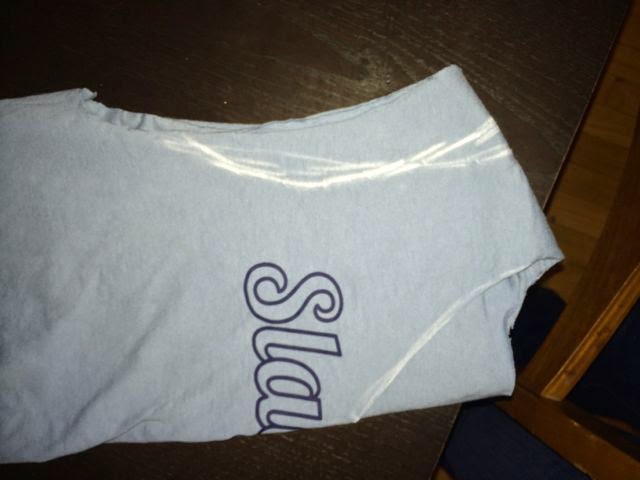
Step 2: Turn it right side out again, and draw on a neckline you like. It's helpful to refer to a shirt with a neckline you like; you can even put it under and trace it. Try the shirt on, and make sure the neckline isn't too low or too gaping. You can also have a friend draw the neckline on as you wear it. Once you decide you like it, cut on your drawn line. You can make it symmetrical by folding it in half down the middle (make sure you only have the front side folded), matching shoulder seams. 


Step 3: Fold your shirt in half, carefully matching side seams, if they exist. NOTE: Sometimes T-shirts shrink crooked. Get it as flat and wrinkle free as you can, and matched up as best you can. Draw on where you want your armholes to be. Remember that they're already pretty big from cutting off the sleeve. Don't cut any more off the bottom, but make the shoulders narrower if you don't want it to be a muscle shirt. Same tips as Step 2. Cut when you're ready. I didn't want mine to be racer back, so I cut my front arm hole in deeper than the back one. 


Step 4: This is the hardest part. Put your shirt on, and think about how you want it to fit. In my case, I knew I wanted to add some fabric around the belly. I also wanted a more feminine shape. I think I decided to add 3", but only 2" under my bust. You can close the big armhole gap a little here by adding this piece of fabric a little higher than the armhole opening. I measured from where I wanted the top of the armhole to be (higher than it was), to where I wanted the narrow place to be, and then from there to the bottom. Then I cut two pieces of the spandex to those measurements. I tapered from the narrow part to the wider part about halfway down the strip. 


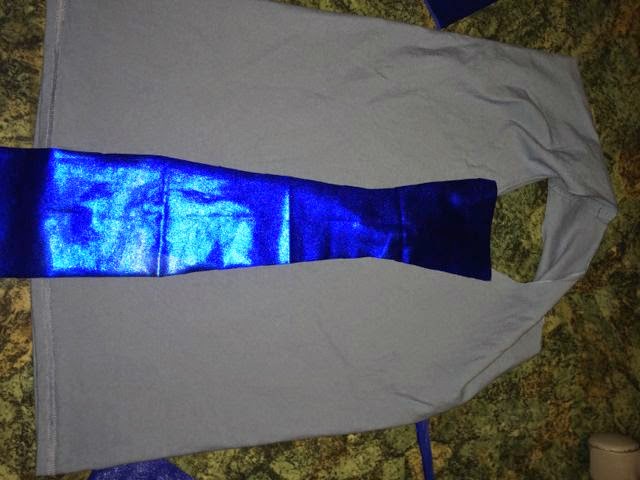
Step 5: Turn your shirt inside out, and cut up the side seams of your shirt. If you don't have side seams, lay the shirt flat and mark where they would be, then cut them. This is weird because all you have is this weird pinnie-like shirt! And if you're spatially challenged like me, you might have a hard time telling which sides go with which once it's open. 

Step 6: Pin your spandex strips to the side seam cuts, wrong sides together. Unfortunately the only photo I have of this is the one I took when I did it wrong and almost turned my shirt into a big tube. Hold it up to make sure it seems like a shirt, before you sew. 

Step 7: Using a narrow zig-zag or stretch stitch, sew the spandex into your shirt. Take out the pins, turn it right side out, and try it on. **It will probably still gap at the armhole/bust and that's OK, you will fix it soon. 

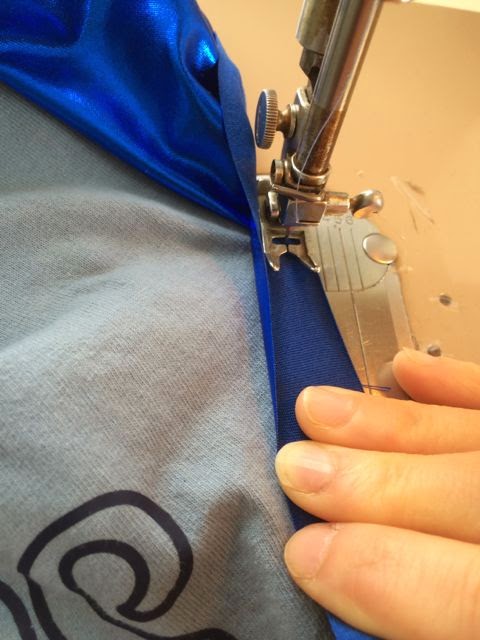
Step 8: Cut a long 1" strip of your spandex. A quilt ruler & rotary cutter works really well for this. 

Step 9: Starting at the back of the neck, place the right side of the spandex strip along the raw edges of the neckline and sew it down 1/4 or so from the edge. Continue around the neck and cut the strip with enough left to fold it under at the end and overlap where you started. Do not stretch the spandex as you sew. Now flip the spandex strip to the inside, and top stitch on the shirt side of the trim, catching the strip underneath. Trim off any extra underneath- the edges won't unravel. 

Step 10: Start at the underarm and do the same for the armholes. This time, stretch the spandex ever so slightly when you are going around the lower front of the armhole to bring that bust gapping in a little. It really works! And you really only need to stretch it a hair. 


And that's it! You're done! I recommend trying it on and cutting off any extra length- I wore mine and found it fit more like a dress, covering up my booty shorts. I ended up cutting off a few inches in the locker room. But I am extra short, the rest of you may not have that issue. 


Friday, July 4, 2014

Best Knee Pad Covers Ever - Tutorial

Skating on a gym floor? Odds are you've been asked to cover your knee pad caps so as not to scratch the floor. You've tried cut off tights, bandanas, shirt sleeves, and everything quick and easy you can think of. These work in a pinch, if practice is NOW and your pads aren't covered. But investing a little bit of time in a longer term solution is completely worth it. No more holes the first time you fall, no more shirt sleeves dropping down onto your foot, no more hot & sweaty knees from the extra layer. And no more replacing your covers every week. I used this method on my first pair of knee pads, and the pads wore out before the covers did. I replaced my knee pads and therefore had to cover the new ones, so I thought I'd share what I did with you.


I actually didn't like the first set of new pads I bought (187 Pro, too bulky for my short legs), so I ended up getting some new new pads, so you'll see two different sets being covered here. One set had removable caps, and the other did not. Covering the removable caps is somewhat easier, but it still was not very hard on the187 Fly pads with the riveted caps. 

Here's what you need:
  • Blue masking tape
  • Fabric- Canvas, denim, duck, twill or other mostly cotton, fairly heavy fabric. I used a black denim with a little sparkle and some stretch I had laying around. Old jeans would work great. If you're buying it, 1/4 yard will be plenty.
  • Chalk, soap sliver, or white crayon or colored pencil for marking. A regular pencil will often work as well, depending on the color of your fabric. 
  • Spray adhesive
  • Newspaper
  • Scissors
  • X-Acto knife (optional)
  • Clear nail polish (optional)


First, you want to cover your caps with the blue tape. You want it as flat as possible, but it doesn't have to be perfect. Tear your pieces of tape longer than the cap and then trim them off and tuck them under as shown.If your caps are removable you can use an X-acto knife to trim tape off the Velcro so it doesn't interfere with the cap's ability to attach.


Next, you want to trace the rough outline of your cap. If your caps are removable, you can place them upside down on your fabric and trace around them; if they're not, then put the fabric over top and feel along the edge and mark it. Now cut the pieces out about an inch or even more outside the line you drew. Too big is better than too small. Make one piece for each cap.


If your caps are attached, tuck the fabric in around the caps to make sure it fits. Trim if necessary, but you want at least a half inch to tuck in all around the edges or it'll come undone. It'll still work, it just won't be as pretty and you might have to tape it.

Now lay out your newspaper and shake your spray adhesive according to the instructions, probably for at least a minute. I like doing this outside, because the spray adhesive oversprays and leaves a sticky film everywhere. And you have to do this part somewhat quickly, so make sure you won't be interrupted. Lay one piece of fabric down, right side down, on the newspaper, and spray it with adhesive according to the instructions. You want a generous coat, but you don't want it to saturate the fabric anywhere. You want to completely coat the fabric all the way to the edges, so spray back and forth past the edges. Make sure you're spraying the recommended distance- usually 8-10 inches- away. That's how you get a nice even coat. Mine wasn't perfect the first time, but by the time I did my 3rd pair I was a pro.

Now quickly pick up the fabric, center it sticky side down over your cap, and starting in the middle, smooth it down and toward the edges. Now the cap is rounded, and you will end up with some sort of pleat, that's OK. Try to make it so you only have two folds on the upper corners. I start in the middle and smooth to each side and down and then do the top, but leave the fold loose for the next step. As you do this, you can usually lift it up and move it if it's not exactly where you want it, but work pretty quickly too so the glue doesn't dry.

Take your scissors and cut the pleat as shown. Overlap the edges and smooth them down. Once you have done this, tuck the edges of the fabric under the cap in the middle of each edge, and then along the edge from the middle towards the corners, sticking the fabric to the back edge of the cap. It will make little folds but it doesn't matter just so long as it sticks.

On my most recent pair, I painted the raw edges where I made the cut with clear nail polish, and it seems to help reduce the fraying. My old ones frayed a bit there.

And there you are! I helped a less-crafty friend do hers and she agreed that it's not that hard, and they hold up beautifully. One of my old ones got a hole, so I peeled it off, stuck a small patch where the hole was, resprayed it and stuck it back on. It worked great! Here are my old pads after several months (a year?) of being covered using this method.


2N1 Skate Shoppe has started carrying the Teflon tape for knee covering. I haven't tried it, but it seems like a good idea.

Friday, November 22, 2013

Ombre Glitter Helmet

Today I'm going to show you my epically awesome helmet. I recently got a new dual-certified helmet. If you don't know about helmet certification, well, that's a post for another day or maybe another blog but suffice it to say, you really should have either a dual-certified helmet or a hockey helmet, end of story. If you want to be convinced, watch the archives from the WFTDA champs this month and look for the S-One ads.


When I started, I had a non-certified helmet, and after just a few months of use I learned about helmet certification and that I really needed a good helmet. There are only a few dual-certified helmets available, with the S-One Lifer being the most popular. Nutcase also made a "crossover" helmet- it has now been discontinued, but lucky me because of that I got one for a great price in one of my team colors (or close at least) at 2N1skateshoppe.com, my "local" Alaskan skate shop.

My team colors are orange and gray-blue. The thinking behind that was to represent the gray-blue of the ocean and our rainy sky, and the orange of the sunset, because Sitka faces West out into the open ocean. My helmet was orange. Vividly orange. And not in the least bit glittery. So obviously something needed to change. I had seen this post about putting your name and number on your helmet, and I happened upon some blue spray glitter in my local craft store, and started to hatch a plan.

Unfortunately I forgot to take pictures for the initial stages of masking, but here's what I did. I happened to have some full-sheet sticker printer paper, so instead of using blue tape, I just printed my name and number directly on the sticker paper. I did a couple of rough drafts first on regular paper to make sure it would be the right size.

The tedious part, of course, was cutting the name and number out with an X-Acto knife. I recommend using new blades and changing the blade if the tip breaks. You could save yourself a lot of hassle by just buying a name and number decal for $9 on Etsy! Or if you have a friend with one of those cutting machines like a Silhouette, you're dialed.

My plan was to leave the orange color for my name and number, and then spray glitter the helmet, so the orange would pop out from the blue glitter. So I stuck the letters themselves on my helmet, instead of cutting them out of the background like the other post showed. Before I applied them, I used a ruler to draw a faint pencil line to make sure I put them on straight. I kept the letters together by leaving little bridges between them as I cut them out, for the purpose of maintaining the spacing and the evenness for the letters. Then once they were stuck down, I used my knife to cut the little bridges away. I wish I had photos of that for you. It made it a lot easier than it would have been sticking it on letter by letter.

Now. If you're clever, you have already noticed the mistake I made, which I did not notice till my ref pointed it out at practice. You want your number on your left, to the inside of the track, and your name on your right, to the outside of the track. Number is for refs, name is for fans. Yeah. The worst part of it is that I knew that and was thinking about it while doing this, but... I am spatially challenged and I didn't check myself. It worried me for a few days but then I figured you know what? It's not like I'm going to play a sanctioned bout any time soon (read: ever) so no biggie. Plus our team rule memorizer says it's not a rule, just a suggestion.

Next, I masked the parts of my helmet I did not want to be glittery, with blue painter's tape. This included the bottom edges of foam, the rivets on the helmet, and the Nutcase logos. I put the tape on, squished it in around the edges with my fingernail, and then cut around the rivets/logos with the X-Acto knife.

And now the fun begins! It was rainy, rainy fall, and the last time I spray painted on my covered deck I left a huge overspray outline on the deck, so this time I created a set up in the basement that seemed to work well. I set up a huge cardboard box (from our team merch order!) and a small paint can to elevate the helmet. I sprayed a little, rotated it a little, sprayed a little, rotated it further, etc., and the box seemed to catch most of the overspray... although I wouldn't do it in the living room! I found a can of blue spray paint when I was digging around for something to perch the helmet on, so I did a bottom layer about half way up in blue. I'm not sure that was really necessary, and I was worried I went up too high because I wanted to keep the top of the helmet orange. I did know I wanted to make sure the area around the letters was totally sprayed, so there would be enough contrast to see.

And then I started with the glitter. I went heavy with the blue on the bottom, and then added silver to make it more gray-blue, and just kept going back and forth till it seemed right. I concentrated the silver on the middle third of the helmet to get the ombre look. On the second or third squirt with the blue, the nozzle got stuck and it just kept spraying! I guess it's common with this kind of glitter (just see the Amazon reviews), and you can solve it with a Q-tip of solvent, which I of course didn't have or know about. So at one point I managed to stop it, and then I got it started again, and so that was my last blast of blue before I finished up with silver. You can see a little how I ended up going back and forth with the blue (which is a little purpley) and the silver. I think I did all the glitter in one sitting, but I don't totally remember- the nozzle malfunction forced that. If I were to do it again I'd try to leave a little more orange on top- I put the letters up so high though I couldn't really do that. 


There are a few schools of thought on unmasking after spraying- some people say to do it when the paint is totally wet, others totally dry, others in between. I went for in between. The can said the glitter dried to the touch in an hour and hard in 24 hours. I unmasked after an hour or thereabouts. The paint was still soft, and I didn't have any peeling issues at all. Whew! I did use my trusty X-Acto knife to gently cut around each letter or object before I peeled it up, and I unmasked the logos and rivets first for practice.

The next step was topcoat. Lots, and lots of topcoat. Maybe 10 layers. Maybe more. The special Glitter Blast topcoat was really great; something about it makes the glitter sparkle even more. The many layers of topcoat also seal down the glitter and I hope will reduce scratching/flaking, though only time will tell on that. One of my teammates mentioned that a former teammate of hers had used chunky glitter on her helmet and it was like sandpaper- not great in the pack! This glitter was smaller and pretty smooth already, but the topcoat really helped with that, too. 


And finally, the topcoat helped when I went to outline the letters and screwed it up a bunch of times and had to take off paint pen with denatured alcohol. That would have been bad without the topcoat- but the glitter was not harmed one bit! I seriously bought 3 or 4 different paint pens, and ended up just using a Sharpie. I thought the Sharpie wouldn't be dark enough or fat enough, but it was actually perfect. There was a slight ridge at the edge of the letters, and I just traced along that edge on the inside. It's not perfect, but it's pretty darn good if I do say so myself.


Friday, August 30, 2013

70's gym shorts... and altering patterns


I'm on a roll here this week with the blogging. I have a lot of ideas but not so much time to get them down! This one will be quick, though.

Starting with turning a regular pair of shorts into Lift & Separate, I've been on a bit of a derby shorts kick. I have made a couple of pairs of high-waisted Lift & Separate shorts from scratch (one of those ideas I have a post planned for, but not completed), and then I saw these 70's gym/roller-rink shorts that I wanted to try. This is a good tutorial for constructing the shorts, because it's slightly different from typical shorts construction- basically the seams are sewn in a different order so you can add the trim. However, it just starts with pattern pieces in hand, so I thought it might be useful to show how to get those shapes that fit together just right.

When I have a piece of clothing I love, I often will just trace the pieces and add a seam allowance in order to recreate it. So that would be one good place to start, if you have a pair of derbyskinz that fit you just right. In this case, however, I'm going to show you how to start with a pattern. I'm using a basic Kwik Sew Yoga Pants pattern (3443) that I picked up at my local Ben Franklin.

Start out by reading the pattern and determining your size. This pattern seems to run pretty big- I wear a medium in nearly everything but I ended up using the XS waistband on this pair of shorts. When I am making changes to a pattern, I always trace it, in case it doesn't work and I need to use the pattern again. In order to do this, I darken the line I want to trace with a soft lead pencil, then lay blank newsprint (I get roll ends from the local paper) over top and then just trace it. Every once in a while I lift up the newsprint to make sure I'm on the right line. You can see in the photo below that the first time I traced this pattern, I made a medium- but I had to give those away!


To turn pants into shorts, you just have to decide how long you want your inseam to be- that's the seam that runs from your lady parts to your inside ankle. Or for shorts, not so far. I measured down 1.5" from the corner that is the crotch seam. I figured that with a 1/4" seam allowance and a 3/4" trim, that would give me a 2" inseam. And truthfully, that might be a little long for derby shorts, they might bunch or roll a little in there when I wear them. When I do this again, I'll probably try 1". 

Once your pattern is traced, you really need to label it really, really well. Because sometimes you might put a project down for a few days or weeks and then come back to it and HAVE NO IDEA which piece is which and how they go together. Ask me how I know. You should always write on it:
  • originial pattern & number
  • pattern piece (front, back, waistband, etc.)
  • size
  • cut instructions as listed on the original
  • grain of fabric and stretch if indicated
  • any pattern markings you need to line pieces up


You can see here I marked the corners, but not the shape of the leg opening, because I knew I wanted to curve it like in that first tutorial. So for this part, I just looked at the pieces in the tutorial and winged it.


I think if I were to do it again I might add a little less on the bottom and cut that corner off a little more.

I traced the front piece exactly from the pattern, although I later made it drop a little more in the front after I tried it on. I did this by just making the front center 1" lower than it originally was, going from that point to the side seam with a straight cut. I should really fix my pattern piece to reflect that change now! And then I traced the wide waistband, but reduced it to be 9" tall, leaving a 4.5" waistband. I didn't want too much extra fabric, it just makes me sweat. I then assembled the shorts according to the directions in that original tutorial. I didn't take any photos of this process, but I think the tutorial does a good job there.

And here they are! The photos aren't great, but you get the idea. I actually think I need to make the waistband even a little smaller around- I like my high waist shorts to act like Spanx! In these pictures, the waistband is almost fully folded down over the shorts.


And one final note- sewing spandex often results in skipped stitches. Make sure you are using a new, ball point needle, preferably one labeled especially or elastic fabric. You also may need to ever so slightly stretch the fabric when sewing to prevent skips, or you can lay tissue paper over the top and then tear it out. And use a narrow zig zag stitch or a stretch stitch. But you knew that.


Saturday, August 24, 2013

Skate Toe Covers/Caps - Pattern & Tutorial

I already posted about how to make the simple, strap-style toe guards. Those are great, and easy to make even if you're not super crafty. However, once you use them for a while you notice that they tend to slip to the side, and/or protect only the front of your skate boot. When I upgraded my boots from Riedell Darts to 495s (and got the right size- which matters a lot), I realized I wanted full toe cap coverage to protect my investment.


Other people have posted about making toe guards, but I didn't find any really good patterns. I started looking at my teammates' toe covers, and ended up just wrapping paper around my skate and adjusting it until it seemed right. And now I've turned it into a pattern to share.

I'm not sure this pattern will fit universally, so I would recommend sewing up a sample in scrap material and trying it on for size, then adjusting as necessary, before cutting into your good material. The first pair I made I just used some scraps of sparkle vinyl. I used those for a few months and they held up remarkably well, skating on a very smooth inside surface. I ended up tearing a small hole in one when I fell skating on pavement, so I decided to make some out of leather.


I looked at my local thrift store for a coat or a purse to repurpose, but I didn't have much luck, so then I looked online to buy a piece of leather (I live on an island in Alaska, remember?). Most leather supply companies seemed to sell whole or half hides (which are huge) or small scraps. But then I found Brettunsvillage.com, where I was able to get a remnant! It cost $30, they shipped it USPS flat rate for free, and although I don't remember exactly how big it is (12 sq feet?) I think I could make 15 pairs of toe guards out of it or more. Not bad for the cost of just one pair, huh? Figuring out what thickness to buy was tricky, and I also don't remember what I got, although I think it was around 3 oz and I know it was "regular" temper. It's pretty perfect, possibly slightly too thick. So here we go!


Toe Cover Pattern & Photo Tutorial

Skills Needed: Basic sewing

Time Required: About half an hour

Tools: Sturdy sewing machine (mine is vintage- you might be able to do it by hand, but I'm not sure I'd bother), office scissors (optional), sharp scissors, marking tool such as chalk/pencil/white crayon/white colored pencil/white soap sliver, leather sewing machine needles, X-Acto knife, leather punch (optional), printer, ruler, crescent wrench to install

Materials: About 1 sq ft leather, thread, contact cement (optional)

Note: It helps to read the instructions through before beginning.

1. Print the pattern below, being sure to scale it at 100%. Check to make sure the square is exactly one inch.


2. Cut out the pattern on the lines using your office scissors. Never cut paper with your sharp/fabric scissors!
3. Place your pattern on your leather as close to an edge as possible, leaving room for another piece, and trace it using the marking tool of your choice. Poke through the lace holes and mark those, and also mark the large circle or + (more on this later). Repeat for the second cover.


4. Cut out the pieces on the tracing line. You could do this with your sharp scissors or your knife.


5. Punch the lace holes with your leather punch, or poke through them with your knife tip and twist the knife to make the hole large enough for your lace. 


6. For the toe stop hole, you can either use your knife to cut the + sign (this is what I do) or you can cut the circle. If you like your stops really close to your boot, I recommend cutting out the circle, because sometimes the extra material makes it hard to screw them down all the way. Err on the side of small here. You can always make it bigger, but if you make it too big, it will wiggle.


7. Brush a 1/8"-ish wide swath of contact cement on the right side side of one edge of one of the pieces. Allow to dry, then carefully match up the top & bottom sections of the edge, sticking them together. Alternately, follow the instructions on your contact cement, or skip this entirely (sometimes it can gum up your sewing machine, so if this happens, just skip it).


8. Using a long straight stitch and a leather needle, sew 1/8" from the edge, being sure to backstitch at the beginning and end of the seam. Note: In the photos I'm sewing 1/4" from the edge. You really want 1/8".


9. Repeat with the other side and the other piece. 


10. Turn inside out and pull on the seams to make sure they are strong. Ta-da! 


Seriously, it just took me less than half an hour to put these together, and that was while taking pictures, too!


To install, unlace your skates and remove the toe stops. Take the washer and nut off the toe stop, put the screw through the big hole or + in your cover, and replace the nut and washer. Reinstall your toe stop, being sure to use a real wrench to tighten the nut down really well, because it's a total pain to tighten the nuts after the cover is fully installed. Remember the order is always boot, washer, nut, cover, stop. Lace through the holes however it makes the most sense for your lacing style- I went across from underneath in the first boot holes, out through the cover's first holes, crossed and back down through the cover's top holes, down into the boot's second set of holes, and then laced as usual. I also skip a hole in a spot that rubs, if you're wondering why it looks weird.

If you want to get really fancy, you could paint or applique designs on the top before sewing them together, or you could add grommets or eyelets to the lace holes, although I don't think that's really necessary.